How to 3D Print a Christmas Ornament from a Photo
By Faisal | November 7, 2026 · 10 min read
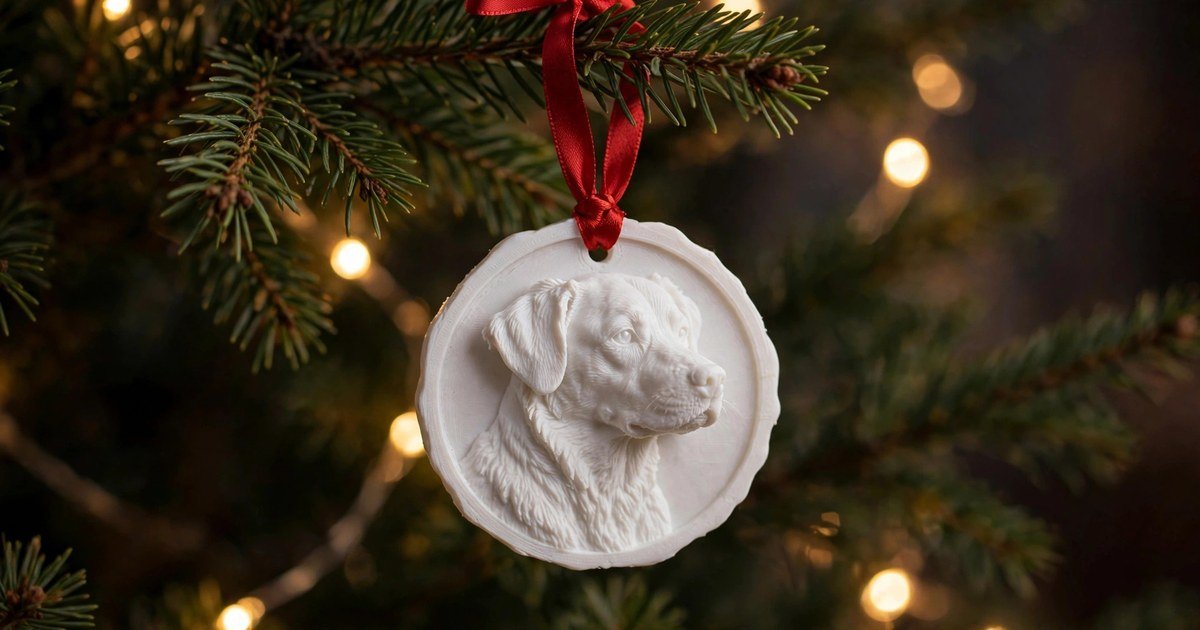
A shop-bought bauble is a nice decoration. An ornament made from your own photo — your dog, your child, a grandparent's wedding portrait — is a keepsake people actually keep. You do not need CAD skills, a 3D scanner, or an expensive AI tool to make one: turn a normal phone photo into a printable ornament with the same free heightmap converter you would use for a wall plaque, printed as a relief medallion with a ribbon through the top.
This guide shows you that route, step by step, including the part most tutorials skip: how to hang it. A heightmap converter makes a flat relief, not a ready-made ornament with a loop, so below I show the simple fix — a plain border at the top and a drilled hole — plus the settings that keep a small ornament strong enough to survive a Christmas tree.
What Kind of Ornament Can You Make from a Photo?
A heightmap converter reads brightness as height: light areas rise, dark areas sink. The result is a relief — a carved-looking panel — not a full 3D figure. For an ornament that is an advantage: a flat medallion is light, prints quickly, needs no supports, and hangs flat against a branch.
| Ornament type | How it is made | Best for | Watch out for |
|---|---|---|---|
| Relief medallion | Photo to heightmap relief, 60–80mm wide, 3–5mm tall, with a base | Portraits, pets, family photos — the main method in this guide | Needs a hanging hole added after printing (see Step 3) |
| Lithophane ornament | Same photo, but very thin (0.8–3mm), backlit by tree lights | A photo that glows when hung near the lights | Needs white PLA, 100% infill, and a stronger light behind it |
This guide follows the relief medallion route — the one you can do entirely free, in your browser, with the converter on this site.
Worked Example: A Dog Portrait Ornament
Example used below: a close-up photo of a dog, face well lit and filling the frame. The goal is a relief medallion, 70mm wide, 4mm tall, printed in warm white PLA, with a red ribbon through a hole at the top.
Step-by-Step: Photo to Christmas Ornament
Step 1: Choose the right photo
The photo decides the ornament more than the printer does. A heightmap needs strong contrast and a clear subject, so pick a photo where:
- The face is large in the frame. A close-up where the face fills most of the photo works best. A photo where the face is tiny in a landscape will turn into a blurry smudge at 70mm wide.
- The lighting is even. Harsh shadows across a face become deep grooves in the relief. Soft daylight, or a photo taken near a window, is ideal.
- There is one clear subject. One dog, one child, one couple — group photos are too small to read at 70mm wide.
- The background is simple. A plain wall, a garden, a sky. A busy background becomes raised texture that fights with the face.
Pets and children make the best ornaments: their faces stay recognisable even as a small relief. If your favourite photo is dark or blurry, pick a different one — no setting can invent detail that is not in the source.
Step 2: Prepare the photo for a heightmap
Before converting, spend two minutes on preparation. Colour carries no height information — brightness does — so look at the photo in black and white. That is what the heightmap will see.
- Crop to a square, tight on the subject. For the dog example, I cropped out the fence and grass, leaving the face and ears filling a square frame — a square crop suits a round medallion.
- Raise the contrast until the subject stands clearly apart from the background — washed-out mid-tones become flat, featureless areas.
- Remove the background if you only want the subject — a clean subject on a plain background prints far better than a busy scene.
- Use a PNG or JPG. The converter accepts PNG and JPG up to 10MB. If your photo is an iPhone HEIC file, convert it to JPG or PNG first — HEIC is not accepted. Do not screenshot it: a screenshot is a low-resolution copy, not your original photo.
Step 3: Convert the photo to STL — and plan the hanging hole
Open imagetostl.net and drag your prepared JPG or PNG in — the tool works entirely in your browser, so your image is never uploaded. Then set the controls for a 70mm ornament:
- Max Height: 3–5mm. I used 4mm for the dog ornament. Lower than 3mm and the face looks flat; higher than 5mm and the ornament gets heavy and every bit of noise is exaggerated.
- Add Base: Turn it on, with a 2–3mm base. The base is what gives the ornament its strength and a flat back to hang flat against a branch.
- Smoothing: Turn it up for photos. Faces and fur look much better with smoothing on, because it softens blocky JPG artifacts into gentle curves.
- Remove Background: Turn it on if you did not already remove the background in Step 2.
- Invert Height: Leave it off unless the relief comes out backwards — for example, a dark dog on a white background where the dog sinks instead of rising.
Now the hanging hole, which is the part that makes this an ornament instead of a plaque. A heightmap converter does not add a loop for you, so plan for one of these two reliable options before you print:
Option A — Drill a hole after printing (simplest, and the one I recommend first). Leave the top 10mm as plain border, with the subject's head below it. After printing, drill a clean 3mm hole through that border, keeping at least 4mm of plastic above it so the loop cannot tear out. Thread a ribbon through the hole — PLA drills easily; drill slowly.
Option B — Add a ring in your slicer. In PrusaSlicer or Bambu Studio, add a small torus primitive overlapping the top edge and merge it before slicing. Make it at least 2mm thick — a thinner loop is the most common reason an ornament snaps. Try Option A first; this takes a few minutes of positioning.
Do not make the hanging point thin: less than 2mm of plastic around a loop or hole will snap the first time the tree is pulled.
Step 4: Slice it for a small, strong ornament
Download the STL and open it in your slicer:
- Size: 60–80mm wide (I used 70mm). Smaller and faces get hard to read; larger and it gets heavy for a branch.
- Layer height: 0.12–0.16mm — finer layers show more facial detail.
- Infill: 15–20% is plenty; the base provides the strength. Use 100% only for a lithophane, where any gap shows as a dark spot when lit.
- Supports: None needed if you print the medallion face-up on its base.
- Brim: A small 3–5mm brim helps a small, flat print stay stuck to the bed, especially if your bed adhesion is borderline.
- Filament: Plain PLA in a light colour — warm white or cream — shows relief detail best. For a lithophane, use plain white PLA only.
- Scale check: STL files carry no units, so confirm the model reads 70mm wide in your slicer before printing — not 7mm or 700mm.
Step 5: Print, finish, and hang it
Print face-up, let the bed cool fully before removing it — prising a small print off a hot bed is how corners snap — then sand flat areas lightly (not the face itself). Thread a ribbon through the hole, hang it on a sturdy branch, and keep it away from real candles — PLA softens with heat.
For gifts, print a small batch: one 70mm ornament takes well under an hour. Change the ribbon colour per person, and write "Christmas 2026" on the back.
Troubleshooting Christmas Ornaments
The loop snapped
The hanging point was too thin. Make the ring at least 2mm thick, or drill the hole with at least 4mm of solid plastic above it. A heavier ornament needs a stronger loop, so keep ornaments at 60–80mm, not larger.
The face is unrecognisable
The photo was too busy, too dark, or too small in the frame. Crop tighter, pick a photo where the face is well lit and fills the frame, and raise the contrast before converting. Group photos rarely work at ornament size.
The ornament warped off the bed
Clean the bed, add a 3–5mm brim, and check the first layer is squished flat, not round.
It looks lumpy or noisy
That is JPG compression noise. Raise smoothing, lower max height to 3mm, and clean the source image again.
Common Questions
Can I really make a Christmas ornament from a photo without CAD?
Yes — for a relief medallion, no CAD at all. Upload a prepared photo, download the STL, slice it, and print it. The only manual step is the hanging hole, a one-minute job after printing.
What size should a photo ornament be?
60–80mm wide is the sweet spot: large enough for a face to read, light enough to hang on a normal branch. I used 70mm in the example. Smaller than 60mm, faces get hard to read; larger than 80mm, the ornament gets heavy.
Can I print an ornament from an iPhone photo?
Yes, but convert the HEIC file to JPG or PNG first — the converter accepts PNG and JPG up to 10MB, not HEIC.
How long does one ornament take to print?
A 70mm relief medallion at 0.12–0.16mm layers usually takes 30–60 minutes. Print one first to check the face, then batch-print the rest.
Is PLA safe to hang on a Christmas tree?
Yes, for a normal tree with LED fairy lights. PLA is a common, safe plastic for decorations. Keep ornaments away from real candles and radiators, because PLA softens with heat, and keep small ornaments out of reach of very young children, as with any small decoration.
Ready to try it?
Turn your favourite photo into a Christmas ornament right now — completely free, no sign-up needed.
Open the Converter →Additional Details
- Name: How to 3D Print a Christmas Ornament from a Photo
- Description: Turn a favourite photo into a personalised Christmas tree ornament: a relief medallion you can print at home, with a hanging loop that will not snap.
- Published: 2026-11-07